Article
Contents: |
|
| |
Making
A Model for Mould Making
To make
a mould you need a model. Taking the time to learn about the
techniques of model making and the materials used to make
these models, will enable you to cast unique and different
products, capable of having the design registered as a copyright.
1) What material to
use to make the model
|
Models
can be made from almost any material from plaster, wax, wood
metal or clay to mention just a few. For the sculptor clay has
much to recommend itself. It can be manipulated easily by hand
or by using tools and produces excellent moulds for duplication
of the original.
Potters or water based clay is very low cost
and can be used but must be kept moist to remain plastic and
workable. It also shrinks when it dries out and is very brittle
and easily damaged.
Air drying clay can also be used but becomes
very hard when dry. It cannot be returned to its plastic form
after drying out.
Oven baked clay is similar to oil based clay
in that it remains plastic and you can shape it for as long
as you like. It is hardened by baking in an oven but cannot
be returned to a plastic state once it has hardened.
|
Plastelina
or oil based clay is always plastic. Unlike
water based clay it does not dry out and harden. Sculpting
can be carried out over as long a period as necessary
without the clay drying, shrinking or losing its plasticity.
Plastelina is an economical medium hard clay excellent
for beginners to start working with. However there
are a variety of oil based clays available such as
Klean Klay in variety of hardnesses from extra firm
to soft. Both clays are sulphur free, a necessity
if making the mould with silicone rubber. Aldax
Plastelina can be purchased here.
|
|
|
| |
2)
Tools to shape the model
Wooden
Clay Tools: A set of
12 cherry wood tools are available to provide an inifinte
variety of shapes to alter the clay surface and is
highly recommended. Of the metal tools on the market
the type with a cutting edge are to be preferred rather
than the cheap wire loop tools seen in the $2.00 shops.
Thin slices of clay can be removed easily using this
type of tool whereas the thicker wire type is clumsy
in comparison and removes far too much clay each time
you use it.
Click
here to buy
|
|
Armatures
to support the clay:
Your clay will need support if the model is large or
has extended parts such as arms or legs in a figurine
and for this extruded aluminium rod or wire can be used.
Form the rough shape of the model and attach it to a
wooden base on which to build your model.
Simply apply the clay over the armature to complete
building up the shape required and then press or carve
in the additional detail required.
Click
here for Armature Wire on our web store
|
|
Clay
Extruders: An excellent tool we used to good
effect in the ceramic industry is the clay extruder. Developed
by Kemper in the US it extrudes a wide variety of clay
shapes to ornament your model. Simply place some clay
in the barrel, select a shape and insert in the barrel,
press on the plunger and Hey Presto as many as 18 different
shapes of clay can be extruded to make anything from flower
posies to walking sticks. Click
here to buy
|
|
Texture
Pads: The use of texture pads to save a great
deal of final carving with your model, is made possible
with a wide range of textures available in the form of
plastic and silicone textures. These are simply pressed
into the clay to leave the desired impression.
Individual textures can be made by pressing silicone putty
against any required texture to make a texture mould for
years of use.
|
|
Rolling
Pins: A rolling pin is very useful for preparing
even thickness slabs of clay for use on your model.
For a 1cm slab use two strips of 1cm thick wood and
use these to support the rolling pin and put some clay
between the two strips and roll out the slab.
There are also some texture rolling pins available for
giving a quick texture to your clay.
Click
Here to buy
|
|
|
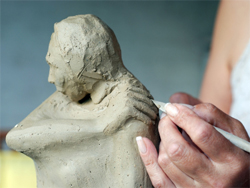
3)
Sculpting the Clay
You do not need an art school diploma to produce
quite beautiful models from oil based clay, it is easier then
you think. Try it and see and you will surprise yourself.
The clay is very forgiving, mistakes can be covered or redone
if it does turn out right the first time. An excellent idea that
I saw a toy soldier sculptor adopt, was to make progressive moulds
of you work. Use these as templates not only for a large variety
of subsequent finished figures, but also as a base for redoing
the sculpt from any partially finished stage, to save redoing
the sculpt from scratch.
If an armature is required fix the shaped galvanized wire it to
a wooden base by making a loop in the base of the wire and screwing
it to the board using a washer to ensure a firm attachment.
If it is a large figure cut some polystyrene foam to pack around
the wire and reduce the amount of clay necessary. Start packing
the clay around the armature using your hands to press and squeeze
it into the rough shape of the model.
Now use the tools to start applying the final detail required.
Clay extrusions can be added or textures can be pressed into the
clay using texture pads. Little balls of clay can be added to
fill out a shape and then refined with the tools.
Texture
pads are ideal for cutting the amount of work required
if making something like a lizard. A texture shaped
like a lizards skin can be quickly pressed over the
model's body to give a professional finish in a very
short time.
To make a unique texture of your own, simply carve
it into a block of oil based clay and make a silicone
mould of the carving and there you have your new texture
pad. The new silicone putty is another easy way to
make a new texture. Mix the Part A with the Part B
of the putty to blend together and then press up against
the texture you require, say the bark of a tree set
aside for 10 minutes and there is your new texture
pad ready for use.
|
|
4)
Finishing touches
To finish your model
and give it a smooth surface use some methylated spirits on
a soft artist brush and brush over any rough spots. This action
will smooth the oil based clay by dissolving it.
We always spray the finished model at this stage with an acrylic
sealer to give it the required matte or gloss finished surface
and also to prevent the clay from sticking to any mould material
such as plaster. Craft
Seal Universal Sealer is an ideal sealer which can be brushed
or sprayed onto the mode.

|
|