| Ask
any mould maker what is their biggest problem and
they will tell you air bubbles in their silicone moulds.
Air bubbles in the mould itself are no great problem,
it is when they are next to the surface of the model
and render the mould imperfect that they begin to
make life difficult.
To get
rid of air bubbles in your silicone moulds you have
several choices:
1) Improved pouring techniques
2) Application of compressed air
3) Removal of air by vacuum
4) Forcing air into solution by pressure |
 |
Improved
pouring techniques
The first coat of any liquid rubber pour is always the most
important. Don’t simply pour the rubber into the mould
box over the model all at once. Pour just enough of the liquid
rubber that will get all surfaces wet. Then tilt the mould
box so the liquid flows over the entire surface of the model.
You will see any air bubbles clinging to the surface of the
model and can pop them. We use a fine taklon brush size 00.
Others use a brush to coat the model with this first rubber
coat. Try both methods and pick the one that works best for
your silicone moulds.
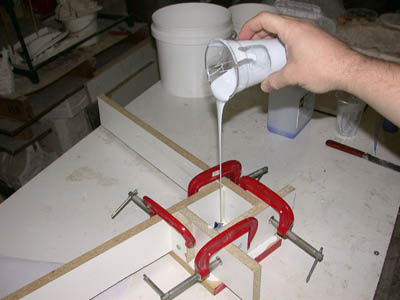
Once the bubbles have been removed pour in the rest of the
mould making material. Pour from as high as possible in as
thin a stream as possible into a corner of the mould and let
it flow over your model.
Application of compressed air onto your silicone moulds
If you have an air compressor you can achieve the same result
without popping air bubbles by using compressed air delivered
from a small nozzle tip at about 30psi direct to the surface
of the first rubber mould pour as described previously.
You use air pressure to blow the material over the model surface
and wet it out thoroughly. The air pressure is usually sufficient
to break any air bubbles clinging to the surface of the model.
Finish pouring your mould material after checking that the
inner surface of the mould rubber is perfect.
Removal of air from your silicone moulds by vacuum
Incorrect mixing can beat air into your mould making mixture
before you even pour it. Stir steadily and slowly without
churning air into the mixture. If you still have air in the
mixture it may be removed using vacuum. Simply mix the mould
making material and place it in a vacuum chamber.
Instructions on
how to make a suitable vacuum chamber and where to purchase
vacuum pumps are available. To use vacuum:
1) Use a container for mixing that will allow your mixture
to double in size without overflowing.
2) When part A and part B have been thoroughly mixed put it
in the vacuum chamber and start the vacuum pump.
3) The material will start to rise immediately as air removal
commences. Let the vacuum reach maximum and then release 2
or 3 times to ensure all air is removed.
4) Let the vacuum down slowly one final time and remove the
de-aired mould making mix from the chamber and pour.
This technique
is only possible with materials that do not set quickly. Check
the label.
Forcing air into solution with air pressure
This may be the only technique possible with quick setting
materials. Instead of removing air as in the vacuum technique
you use pressure to force bubbles into solution. Pressure
pots are freely available, you have seen painters use them
with an air compressor for spraying paint. To use a pressure
vessel:
1) Select a mould box that will fit into the paint pot you
have available and double check the setting times of your
material from the data sheet.
2) Mix the mould making material and pour it over the model.
3) Close the lid on the pressure vessel and presurise it to
60-100psi.
4) Leave the material in the pressure pot at that pressure
until it has set. Most rubber mould making materials work
like a charm with this technique. Try it.
|